
The SpiderAdmin service was introduced in Lesson 3. We will now go thoroughly through its features and benefits. For the sake of completeness we repeat the introduction that was presented there.
If you want your application to participate in the game then the first thing you have to do is to include the SpiderAdmin dependency in your project. SpiderAdmin is a complimentary service that is not available on the Maven Central Repository, therefore you need to define the Spiderwiz internal repository in your project:
<project>
  ...
  <repositories>
    <repository>
      <id>spiderwiz-internal</id>
      <url>http://spiderwiz.org/repo</url>
    </repository>
  </repositories>
  ...
</project>
With
this in place you can specify the spider-admin
dependency:
<dependency>
    <groupId>org.spiderwiz</groupId>
    <artifactId>spiderwiz-admin</artifactId>
    <version>2.2</version>
</dependency>
Non-Maven
users can download spiderwiz-admin.jar
directly by this link.
As mentioned above, this needs to be included in every application that you want to be governed by SpiderAdmin. However, it is enough to connect only one application to the service, and it will be used as a “hole” through which the “colonoscope” penetrates the entire service-mesh and administers every SpiderAdmin-enabled application. The demonstration hereinafter assumes that the “hole” is My Hub. It works as follows:
First, you must be a registered SpiderAdmin user. Go here and use the panel on the right of the screen to register, or log in if you have done it already. If you prefer not to register at this moment but still want to taste the experience, you can use the predefined “test” user with “test” also as the password. Once logged in, you will be redirected to the SpiderAdmin service page. If you have not connected yet any application to the service (and if you use the “test” account then no other user of that account has), you will see a page like this:
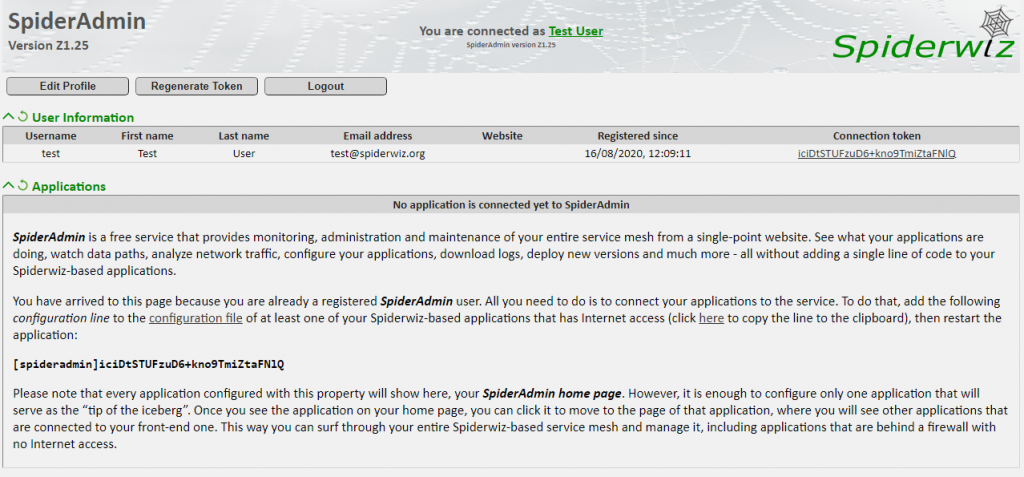
Follow
the instructions on the page and copy the displayed configuration property to hub.conf, which will now look like this:
[log folder]Logs
[consumer server-1]websocket;ping-rate=30
[producer server-1]websocket;ping-rate=30
[consumer server-2]port=10001
[spideradmin]W6WEMWZEbCRImAMvgf2M2Xtt3tvH
[hub mode]yes
[mail system]smtp;server=smtp.gmail.com;user=tester@spiderwiz.org;pwd=dumptrump;port=465;ssl=true
[from address]My Hub Alerts<alert@spiderwiz.org>
[to email]Spiderwiz Administrator<spiderwiz.admin@gmail.com>
[to exception email]Spiderwiz Programmer<spiderwiz.geek@gmail.com>
Restart My Hub and all the other applications. Soon the SpiderAdmin service page will refresh to show something like this:
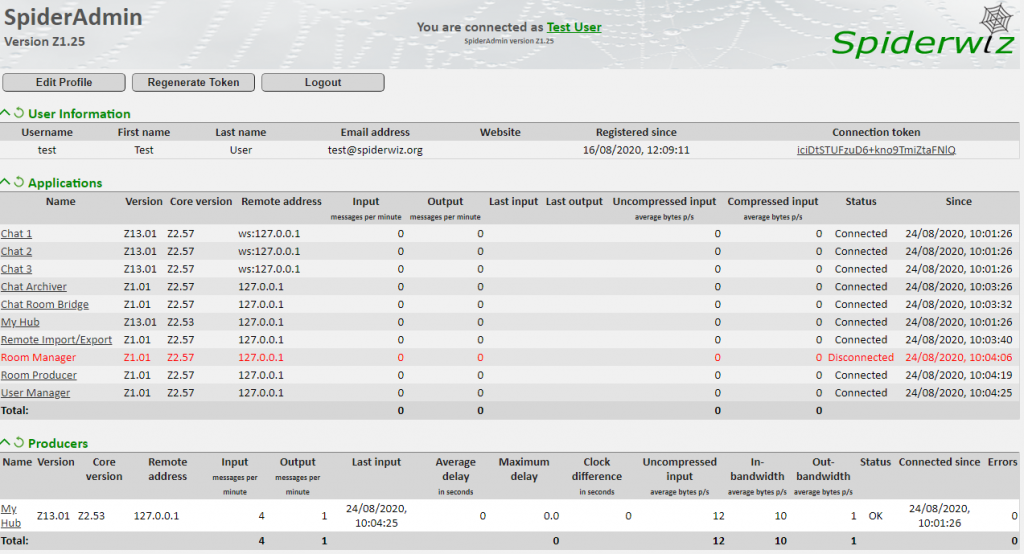
Let’s dwell on what we see here. The “Applications” table shows all the active applications, while the “Producers” table shows My Hub that connects directly. You can now surf through the entire service mesh by clicking from application to application.
We remind you that the only application that connects to the service directly is My Hub. It means that the other applications do not need to do it, and actually they do not even need to have Internet access. In terms of cloud computing, your application network can span across different clouds with different protection attributes. The only requirements are that they will be connected somehow, the connection will be configured by Spiderwiz and at least one of them will be configured to connect to SpiderAdmin.
Note that SpiderAdmin is not a full-fledged management system such as Istio, for instance. It does not deal with security, resource control, short circuits and some other commonly available management features. On the other hand, unlike common management systems that require full access to the managed applications, SpiderAdmin can monitor, configure, download log files, control and even upgrade applications that are behind a firewall.
Another unique aspect of SpiderAdmin is that it controls and monitors the logical data paths between applications. With SpiderAdmin you can see not only how data moves between applications, but also what moves between them. And you can customize SpiderAdmin to expose any information that you need about the execution of your applications. In other words, if common management systems are supposed to ensure that your applications are deployed and function the way you want them to, SpiderAdmin helps you to ensure that they do what you expect them to do. SpiderAdmin and management systems can peacefully exist side by side with quite a small overlap between them.
Having clarified that point, let’s delve into various SpiderAdmin features.
As you can see in the screenshot above, SpiderAdmin displays information about the networked applications, their status and the traffic between them. With the respect to the latter, Spiderwiz shows statistics of both physical traffic (in the “Compressed input” column) – counting the actual number of bytes on the line, and logical traffic (in the “Uncompressed input” column) – measuring the volume of the full data that the physical bytes represent.
Every application name is a link to the application page. Try clicking on “Chat Room Bridge” and you will see something like this:
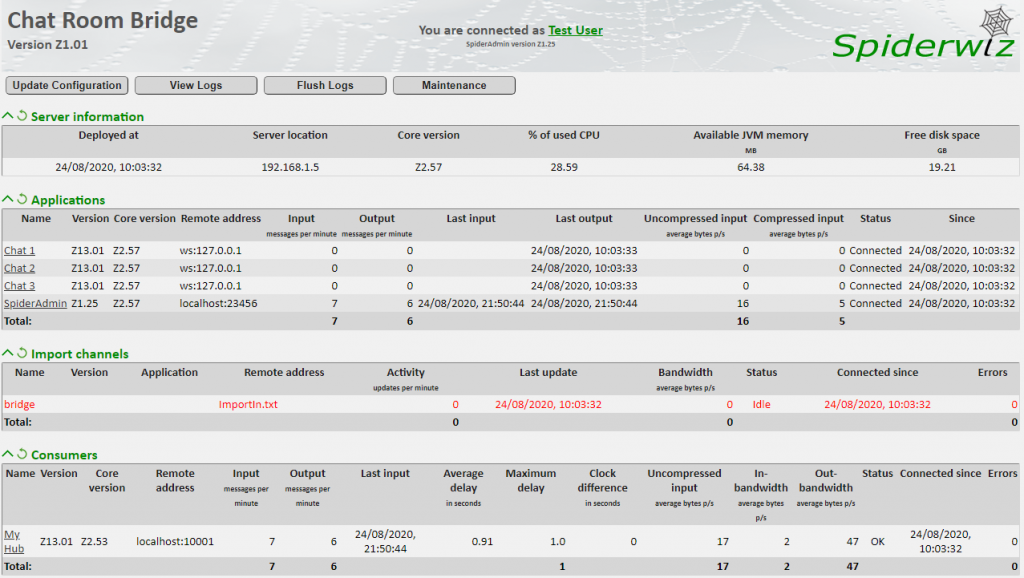
You see a “Server information” table that shows information about the machine that runs the current application (Chat Room Bridge), an “Applications” table that shows all the applications that interact with the current application, an “Import channels” table that shows the import-export channels that are interfaced by the current application and a “Consumers” application that shows My Hub, which is the only application that is connected to the current application directly, in this case as a consumer. If there were direct producers you would also see a “Producers” table.
Note that the applications listed in the “Applications” table are not necessarily connected directly by the current application. They are there because they exchange Data Objects with the current application. That’s why My Hub is not in the “Applications” table, as it is only a hub that Data Objects go through.
Let’s start now with some action. If you click the “Update Configuration” button at the top-left of the page, you should see something like this:
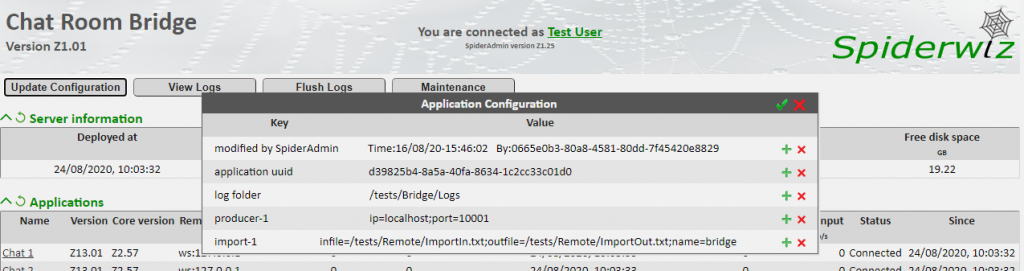
You see the configuration table of the current application.
You can modify any property (except application
uuid) and click the ✓
symbol on the top-right of the pop-up window. The changes will have an
immediate effect. If, for instance, you change anything in producer-1 or import-1,
then the referred channel is disconnected and reconnected with the new
parameters.
Try clicking the next button – “View Logs”. You get something like this:
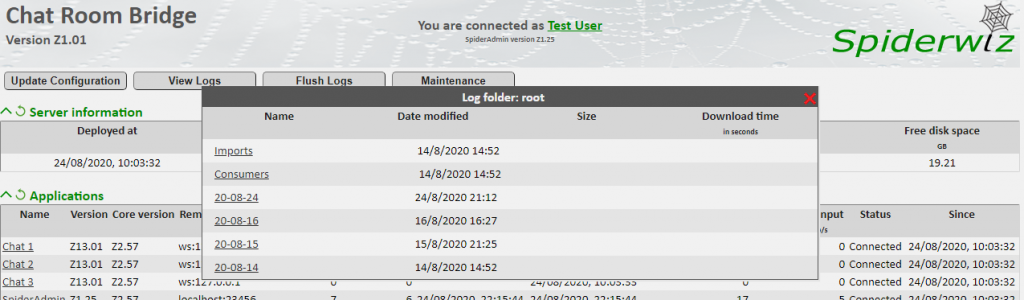
You see the listing of the configured “log folder”. You can click on subfolder names to get their listing. When you get to a listing that includes log files, you can click on the file name to download it.
If you prefer to access log files directly, you can use the “Flush Logs” button to flush all logs files before you access them. There is no need to do that if you download log files through the “View Logs” button because this is done automatically before a file is downloaded.
Using the “Maintenance” button you can restart your application and even upgrade it (without having access to the machine that runs the application!). To make it work you need to ensure that your application is configured properly for activating the right “restart” and “deploy” commands, as follows:
- In the configuration file, configure “restart command” to specify the command that
SpiderAdmin needs to use in order to restart the application, as a comma
separated list of arguments to use when instantiating ProcessBuilder. The default value is “
cmd,/c,restart.bat“, i.e. The Windows arguments for running “restart.bat” in the application’s root folder. - Configure also “deploy command” to specify the command that SpiderAdmin needs to use in
order to deploy the application, as a comma separated list of arguments to use
when instantiating ProcessBuilder. To this list, SpiderAdmin
will add the name of the deployment file as supplied by the user, which is supposed to be
a parameter in the batch file that is activated by this command . The default
value is “
cmd,/c,deploy.bat“, i.e. The Windows arguments for running “deploy.bat” in the application’s root folder. - Configure “deploy folder” to specify the folder to which SpiderAdmin copies deployment
files for this application. The default is
Deployunder the application’s root folder. - Create the necessary batch files for performing restart and deploy.
To demonstrate the use of the “Maintenance” button we assume
that Chat Room Bridge, whose page we
are watching now, is installed as a Windows service (for example using Tanuki’s Java Service Wrapper) named chatroombridge. We use the default
values of the configuration properties mentioned above.
To enable application restart we create a restart.bat file in the application’s
root folder that looks like this:
net start chatroombridge
net stop chatroombridge
For application deployment we first need to figure out the deployment file type . In the case of a web application, this would normally be a war file. Our example here is a command-line Java application, so we assume that all the files comprising the executable and its libraries are packed into one zip file (for example using the Maven Assembly Plugin to build a ZIP distribution). Therefore we create a deploy.bat file in the application’s root folder that looks like this:
net start chatroombridge
unzip deploy%1 .
net stop chatroombridge
This batch file stops the chatroombridge service, unzips the file that is under the deploy folder whose name is given as a
parameter and restarts the service. We assume that “unzip.exe” is available and
specified in the PATH system variable. If this is not the case you would need
to provide another command.
Now everything is in place and we can see how it works in SpiderAdmin. When you click the “Maintenance” button it pops up a sub-menu like this:
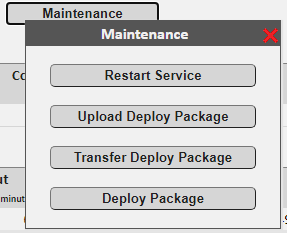
The first option is “Restart Service”. Click it and the restart procedure we have just described will execute.
The second option is “Upload Deploy Package”. Clicking it pops up a window like this:
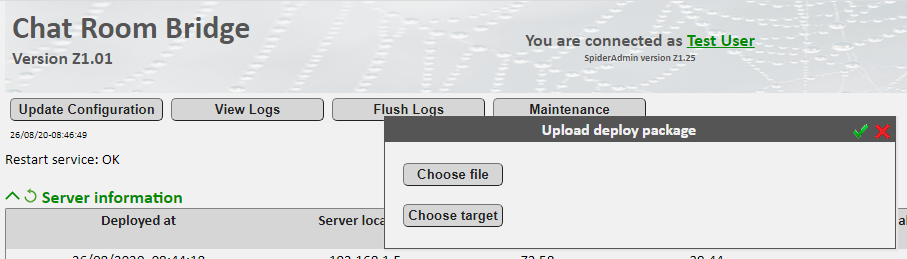
You have one button to choose a file from your local disk
for uploading (the distribution zip
file in our case), and another button to choose the upload location in your
user’s area on the SpiderAdmin service.
Having chosen the relevant data, click the ✓ symbol
on the top-right of the pop-up window, and the selected deployment file will
upload to its place.
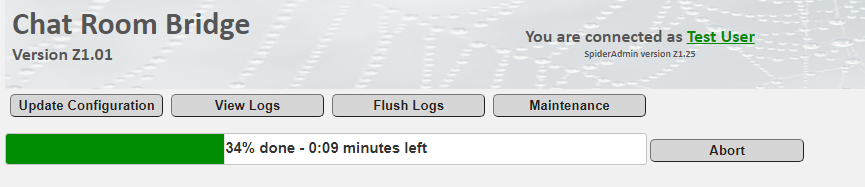
The third option in the “Maintenance” sub-menu is “Transfer Deploy Package”. Click it and it will take you to the folder list of your area on the SpiderAdmin service. Click the file you want to deploy and you will see something like this:
Once file transfer completes, click “Maintenance” again and select the last option – “Deploy Package”. This pops up a window that lets you choose the file you want to deploy from the folder configured as “deploy folder” in the application that you want to upgrade. This activates the deploy batch file that was mentioned above with the file name as the parameter.
See more about SpiderAdmin in Lesson 18. In the next lesson we will start learning how to extend Spiderwiz.